
Getting Weird with Piezos
7 min read
Will Puckett
Last fall, my 3d printing processes came unhinged. I was preparing to take on some explorations in clay, and I prudently decided to begin by ripping both of my printers completely apart. Through the years, my printers' chassis had become a hodgepodge of transformers, buck converters wrapped in heatshrink tube and level shifters: I needed to find clarity.
Direct Feed Extrusion
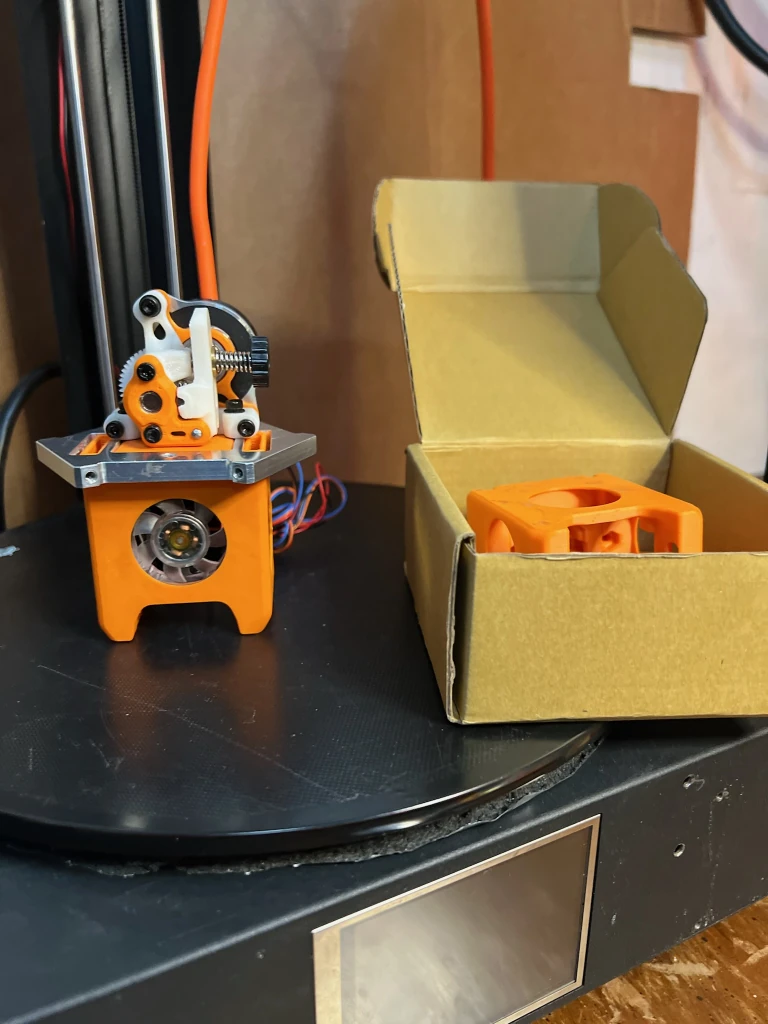
When it came time to test out the Flex3Drive G5 I had exumed from my parts collection, I decided to put it on my QQ-S Pro. I thought the delta inparticular would benefit from the low mass of the G5. Despite the hack job of an installation I did, the prints came out very nicely—with a 0.4mm nozzle. Most of my prints, however, were designed for high-flow 1.0mm, which I pretty much wrecked the G5 trying to execute. Although I had anticipated the stepper wouldn't have enough torque at the high speed necessary for the larger flow, I was surprised that the gears were moving fine, it was just that they couldn't grip the filament and gnawed it to shreds.
I needed to find something else that could handle my application, so I ordered a CNC Sherpa Micro. It showed up in a few weeks, and I excitedly stuffed it in my parts cabinet where I could properly ignore it.
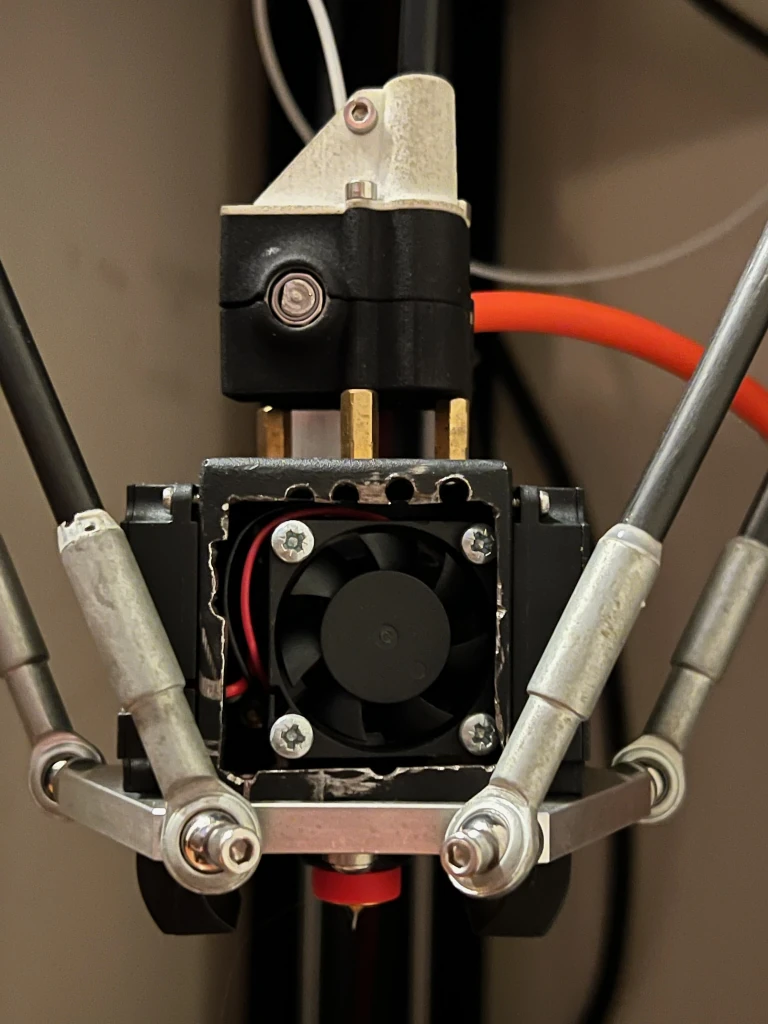
Slowly, the time came round to make a go at installing it. I had swiss-cheesed the original mount so severly in the process of installing the G5, I couldn't find a position and orientation to attach the new extruder that felt at all stable. I also wanted to drop things down—lowering the center of gravity seemed like the right thing to do. This led me to mounting the extruder on the effector with the FLSun hotend box mounted under the effector. It felt stable and solid. All was well, except that I had completely blocked my ability to mount the stock magnetic switch probe.
The Fundamentality of Probing
It was at this time that I began to internalize how fundamental probing is, imparticular on delta, where it is used to establish not only the bed position, but the squareness of the towers. I also realized how much I avoided using the probe because it was annoying to attach and connect. I had seen in passing others on the internet who used the nozzle itself to probe, which seemed a far better solution than simply trying to extend the mount for the switch probe I had, especially considering how I had never really liked the way it sometimes tilted slightly during some probe moves. I also wanted to be able to explore working on different materials with perhaps a plaster slab or a sheet of wood placed on the bed.
It felt like it was a bad idea to use a probe that was offset from the nozzle in the x and y. I spent a Sunday afternoon pouring over all3dp's bed leveling sensors article. Although I liked the idea of using a smart effector, the costs of the magball arms and the additional work of switching them out was comparable to just buying a whole new printer. I was hesitant to use a probe type that hung down from the effector near the print and had to be a couple of millimeters above the nozzle since I sometimes got glumps and clumps that could potentially reach it. (Printing 1 mm extrusions is a more rough and tumble endeavor than working in 0.4mm.) This left the precision piezo, but it just seemed like having the extra tube between the extruder and the hotend was not great and I was afraid it would make the nozzle less stable.
It occurred to me that I might be able to use the ADXL345 accelerometer as a probe. I started searching and indeed a substantial exploration of the concept had already been made, which had been abandoned due to noise issues.
Let's Go Piezo
Things always get a little weird when the piezos come out... Small, ceramic discs that produce a vibration from a voltage (or vice versa), they're super useful for tasks ranging from making annoying buzzing sounds to leak detection to measuring tiny distances.
I wasn't really sure what I would need, or where to put the piezos. Several members of the 3DP community had written extensively about using them, and I tried to digest their writings so I could build on the "shoulders of giants." Ideally, I wanted to place the piezos under the bed so I could use different tools with the same probe. I had a marshmellow piezo in the studio that I hooked up to my phone and started dropping (hurling) boots on the ground to begin to get a feeling for what kind of sensitivities I might be able to utilize, and subsequently ordered a small piezo for which I made a small printed trigger I installed under the bed. It worked great, but I didn't feel like having a printed piece under the bed was a long term solution. Resilient, I installed 3 piezos on the screws under the bed and hooked them up, only to find the less direct contact didn't work as well.
I then became aware of the Chladni plate problem (a concept I had known as cymatics). This made the idea of a generalized bed-attached probe less attractive, although I continued sinking time into it for a while longer.
I also remodeled the mount for the micro sherpa extruder by remixing the beautiful mini after sherpa for delta. I decided to try just screwing a piezo down between the extruder and the effector. It worked really well over a little more than half the plate... and then triggered either late or not at all on the other half. In retrospect, this was obviously because of effector tilt, and I should have simply added another one under the other extruder screw.
I explored using a mass dampened piezo, which I mounted to the bed with great success, and then later beside the bed so I could leave it permanently deployed—with less success. In order for the side mounted mass dampened piezo to work reliably, I had to probe at a higher speed—more like 12mm/s—and I was afraid that over time I would chip the bed. Most problematically, it failed to work at all through the protective layer of glue in which the bed is generally coated.
My friend and I hacked a TapChanger on his Mendel Max, and at that point I came to more deeply appreciate the benefits of a continuously available probe and the simplicity it brings to switching materials. The nozzle and bed are expanding and contracting with temperature changes, which had always thrown my z-offset when I changed materials. With a continuously deployed probe it's a non-issue.
I had happened into some awesome really small mass dampened piezos on sparkfun, so I ordered a few and tried them. I also modeled a new mount for my extruder and hot end that allowed me to place a single disc piezo around the tube between the two. The new mount sandwiched the piezo leads in between a small spacer and the mount which eliminated me accidentally breaking them off during stripping. I tried both setups, and although the small mass dampened piezos worked, the results weren't anywhere nearly as good as the single disc wrapping the filament path.
I continued on to write a small G30 macro that touches the bed after everything is at temp and changes the z 0 position. It works brilliantly and has even allowed me to dramtaically reduce the thickness of my protective glue layer.
Deeper Integration
There's already an onboard comparator on most of the mcus that run Klipper. It would be cool to support them in firmware, so users could have access to a very low cost, easily implementable nozzle probe. As I see it, these on board comparators could be enabled in 1 of two ways—either setup in kconfig with a static value at build time, or dynamically configurable in runtime.
Navigating the klipper make system is no small challenge, and it seems like the easier of the two ways to implement would be to have a static value set at build time. Of course, the sensitivity of a piezo changes with temperature, so it would be really nice to be able to have software adjust it accounting for this factor. But neither the comparator nor DAC pin types are available in klipper, and building them out across all the mcus the software supports could be a substantial undertaking. Furthermore, I haven't adjusted my offboard piezo's sensitivity since I installed it during much cooler weather, so it might not matter enough to matter.